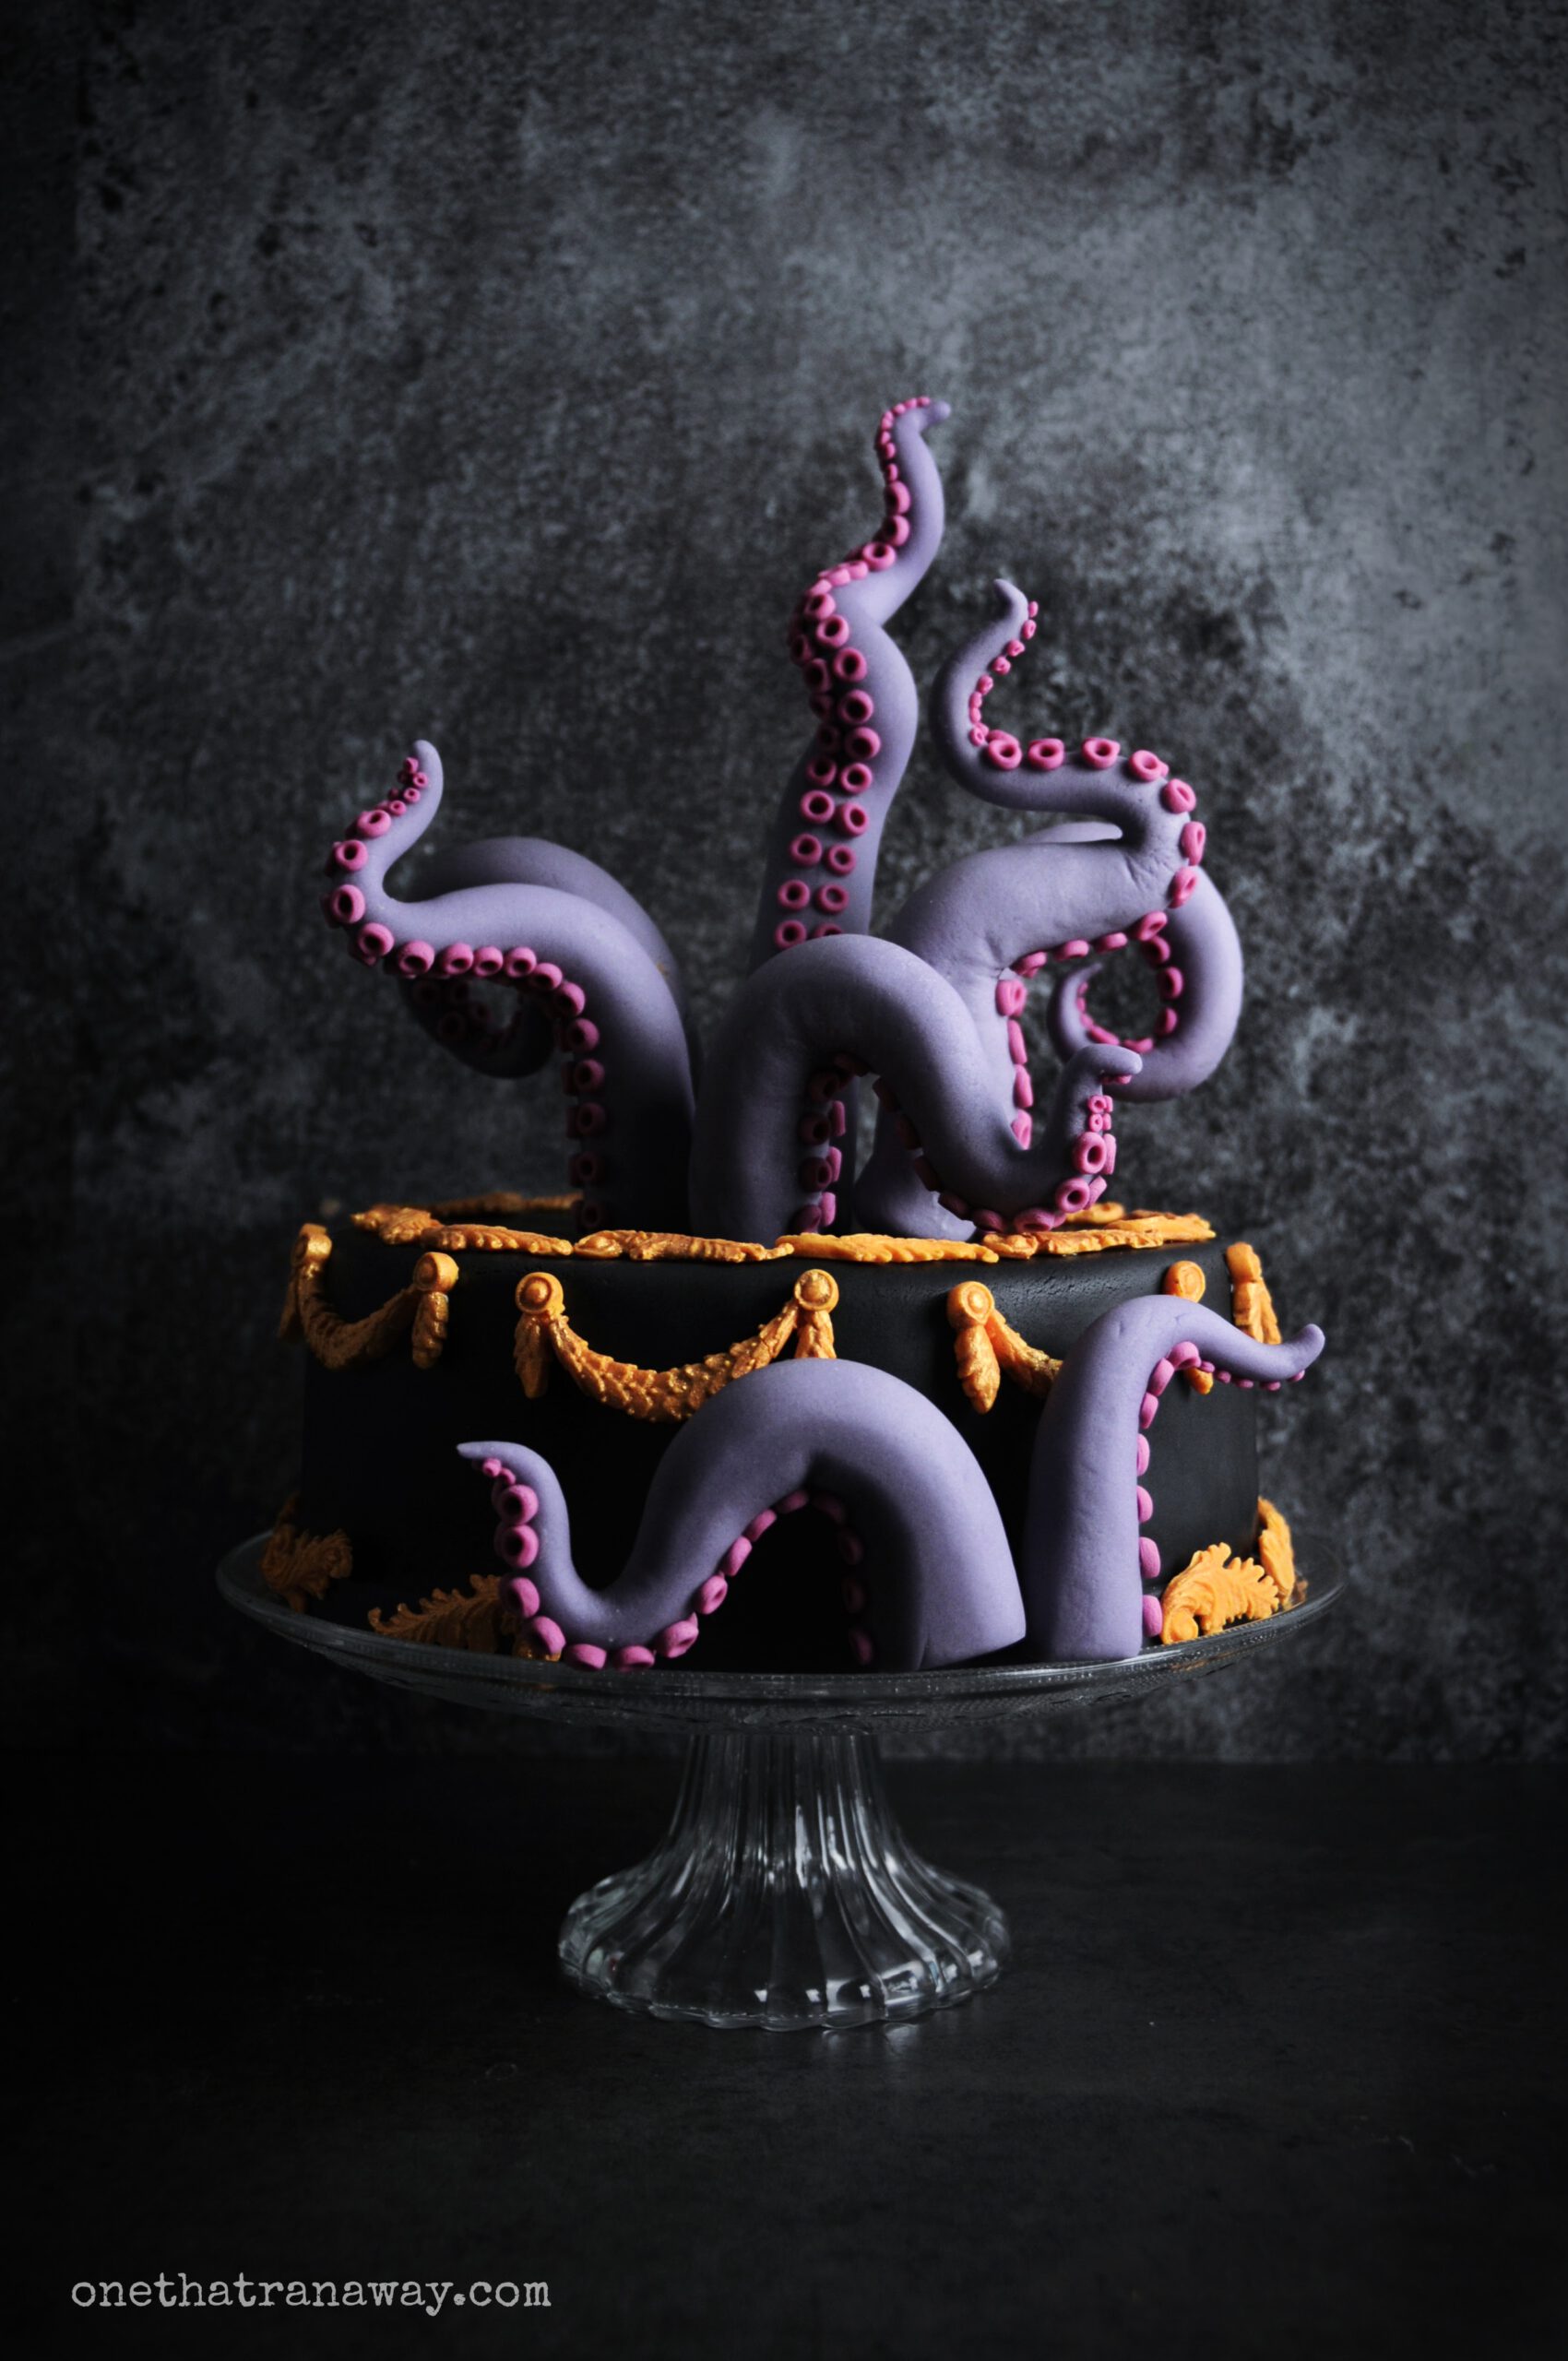
We’re halfway to Halloween! Can you believe it? Last week I showed you how to make silhouette cupcake toppers and promised that it would be the first of a small series of posts about throwing a “classic horror novels” Halloween party. So naturally, today we’ll move on to the second one! Thinking of classic horror novels, not only Frankenstein and Edgar Allan Poe – which were both featured in last week’s silhouette cupcake toppers – come to mind. We cannot talk about classic horror novels without including H.P. Lovecraft and, more specifically, the almighty Cthulhu. So today, I will give a small instruction on how to create a magnificent, creepy tentacle cake.
Today, we won’t go into detail about H.P. Lovecraft or why his legacy is problematic. All of that is widely known I hope it doesn’t need saying that racism and white supremacy are never okay. No, today, I will just acknowledge Lovecraft’s contribution to the world of horror and stories of the weird and terrifying.
So, before I will dive into the making of a Cthulhu-inspired tentacle cake, I will leave you with a quote from Matt Ruff’s “Lovecraft Country”: “But stories are like people, Atticus. Loving them doesn’t make them perfect. You try to cherish their virtues and overlook their flaws. The flaws are still there, though.”
Anyway, tentacles!
Is there anything creepier, stranger and more morbidly-fascinating than crawling, slimy, unearthly tentacles? Even without seeing the body attached to them, they are harbingers of an eldritch horror that you can only imagine. To be honest, I find tentacles terrifying and uncanny.
So of course I had to incorporate them into our “classic horror novels” theme!
Needless to say, though, that this is a cake you can easily present at a pirate-themed or even Arielle-themed party, as well. Who says that tentacles are only for Halloween? They work very well for aquatic or pirate themes, too.
please note beforehand
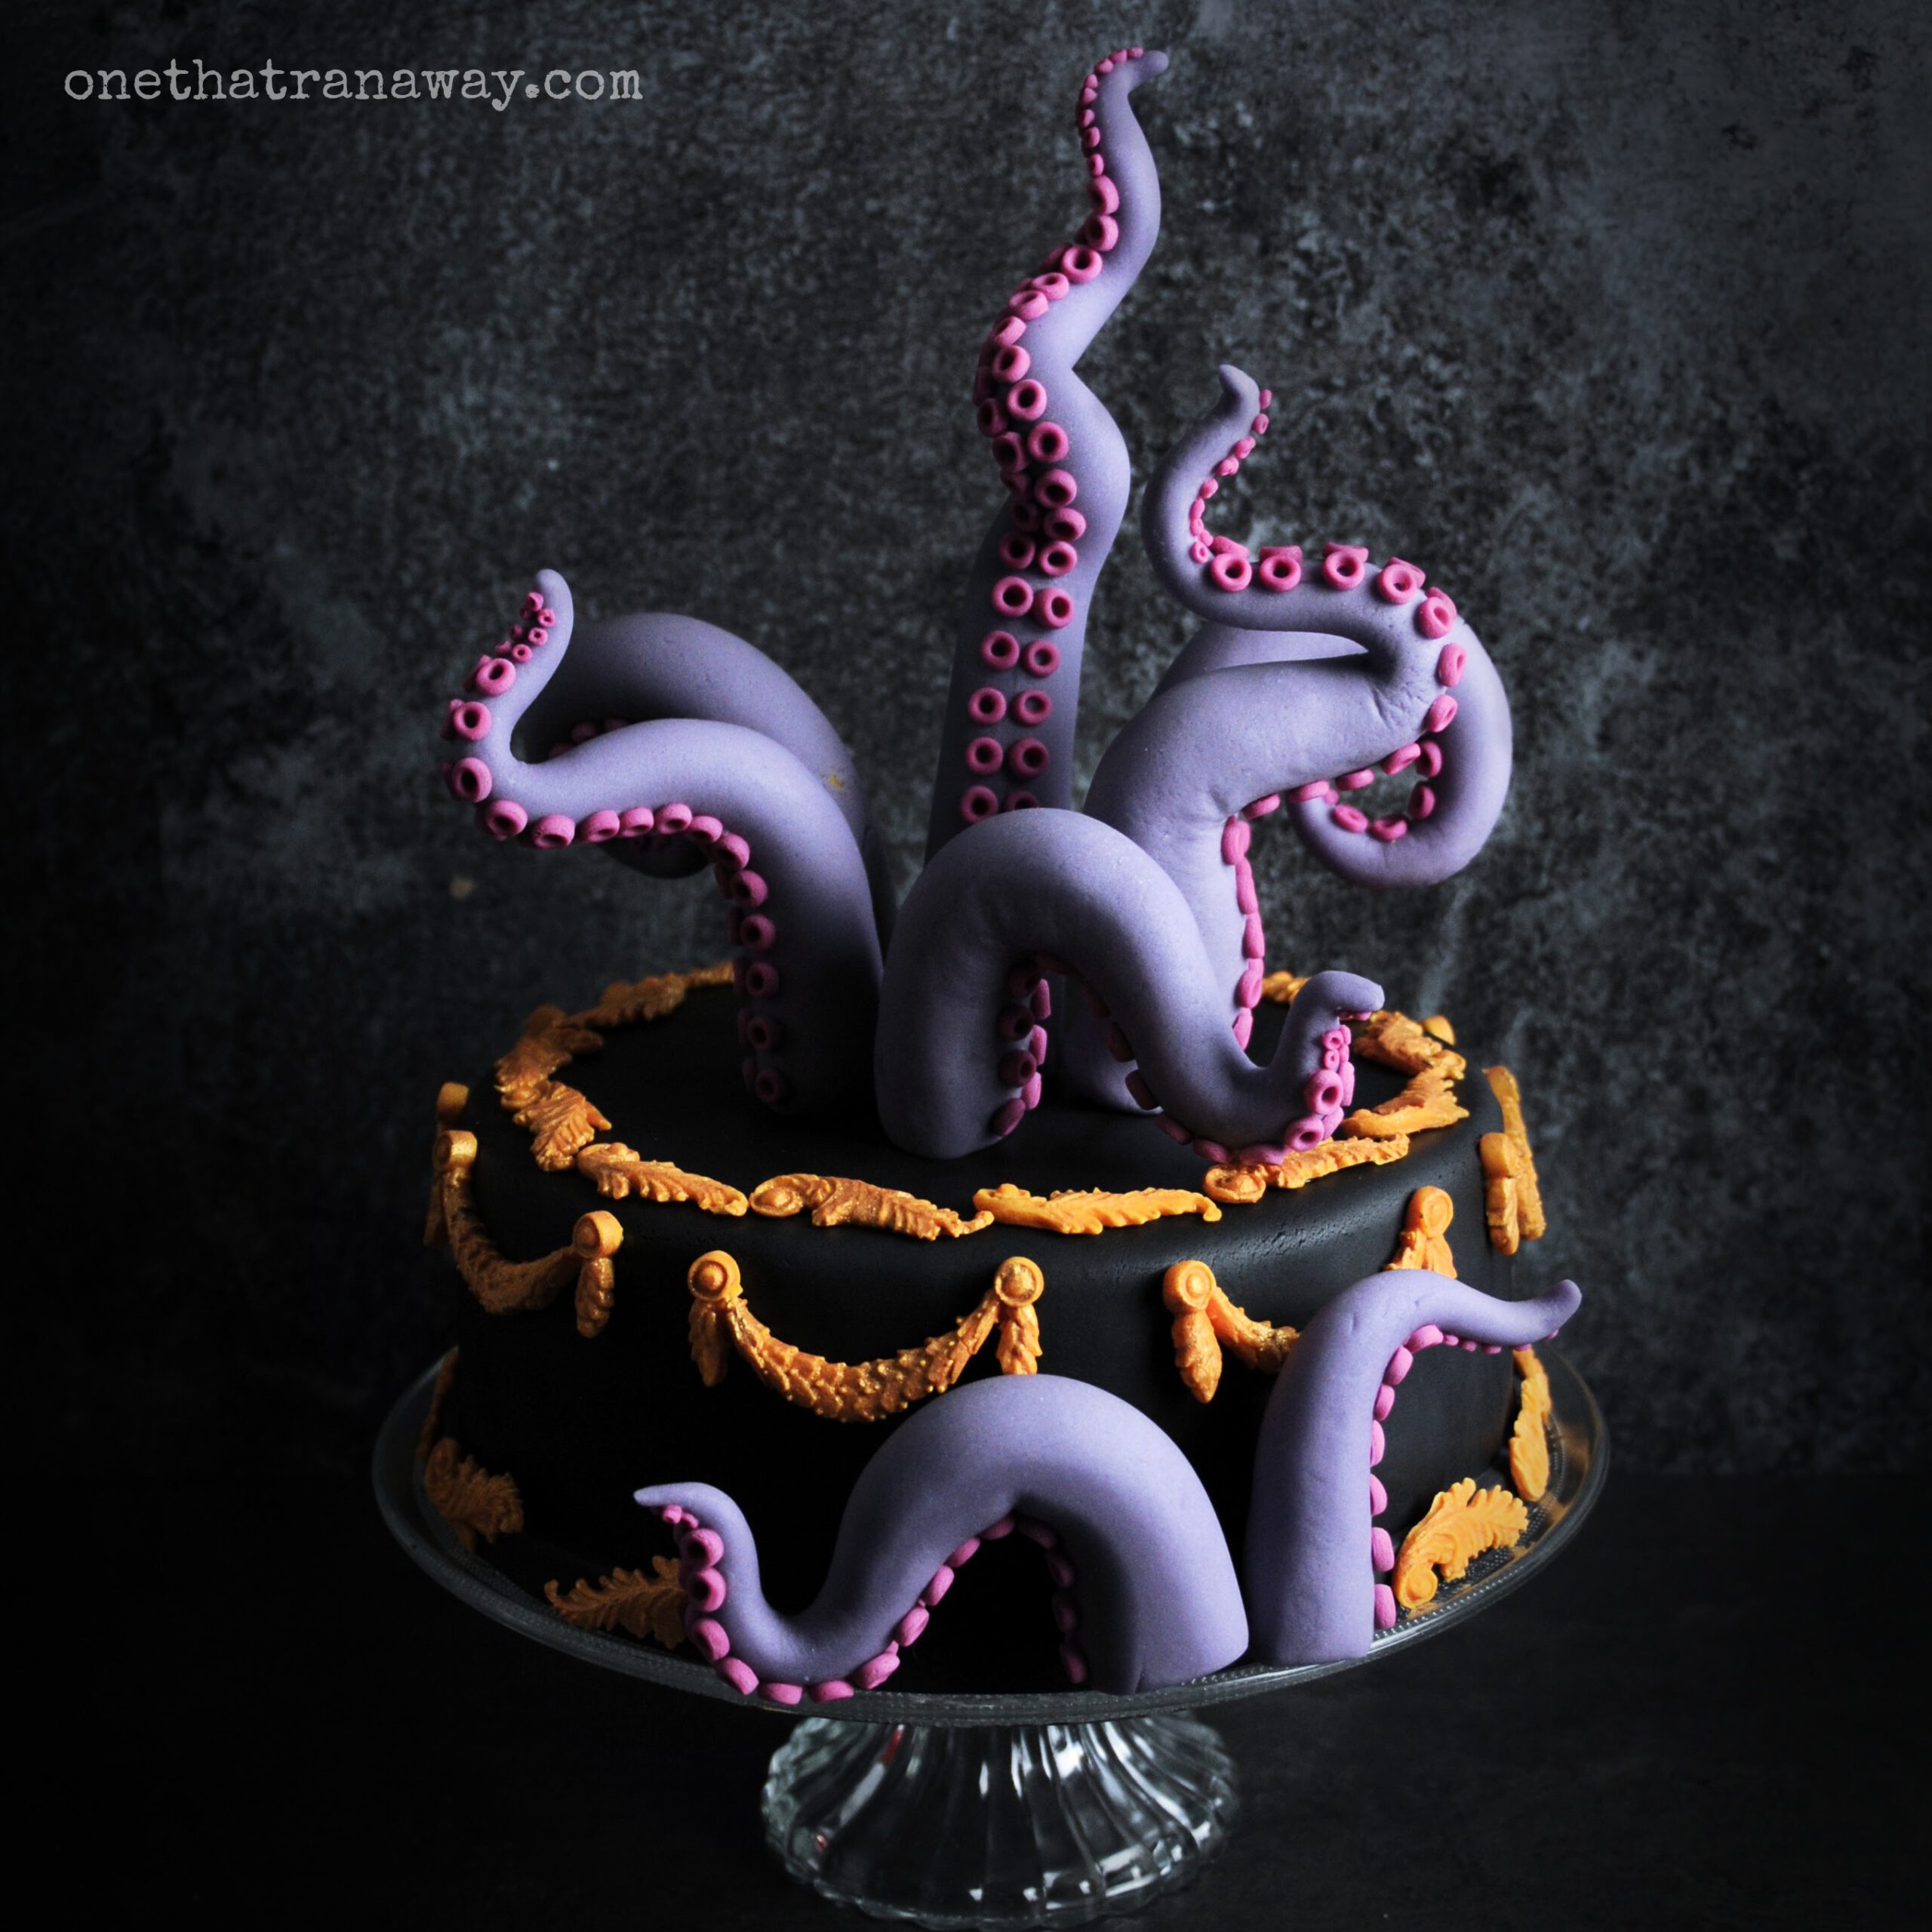
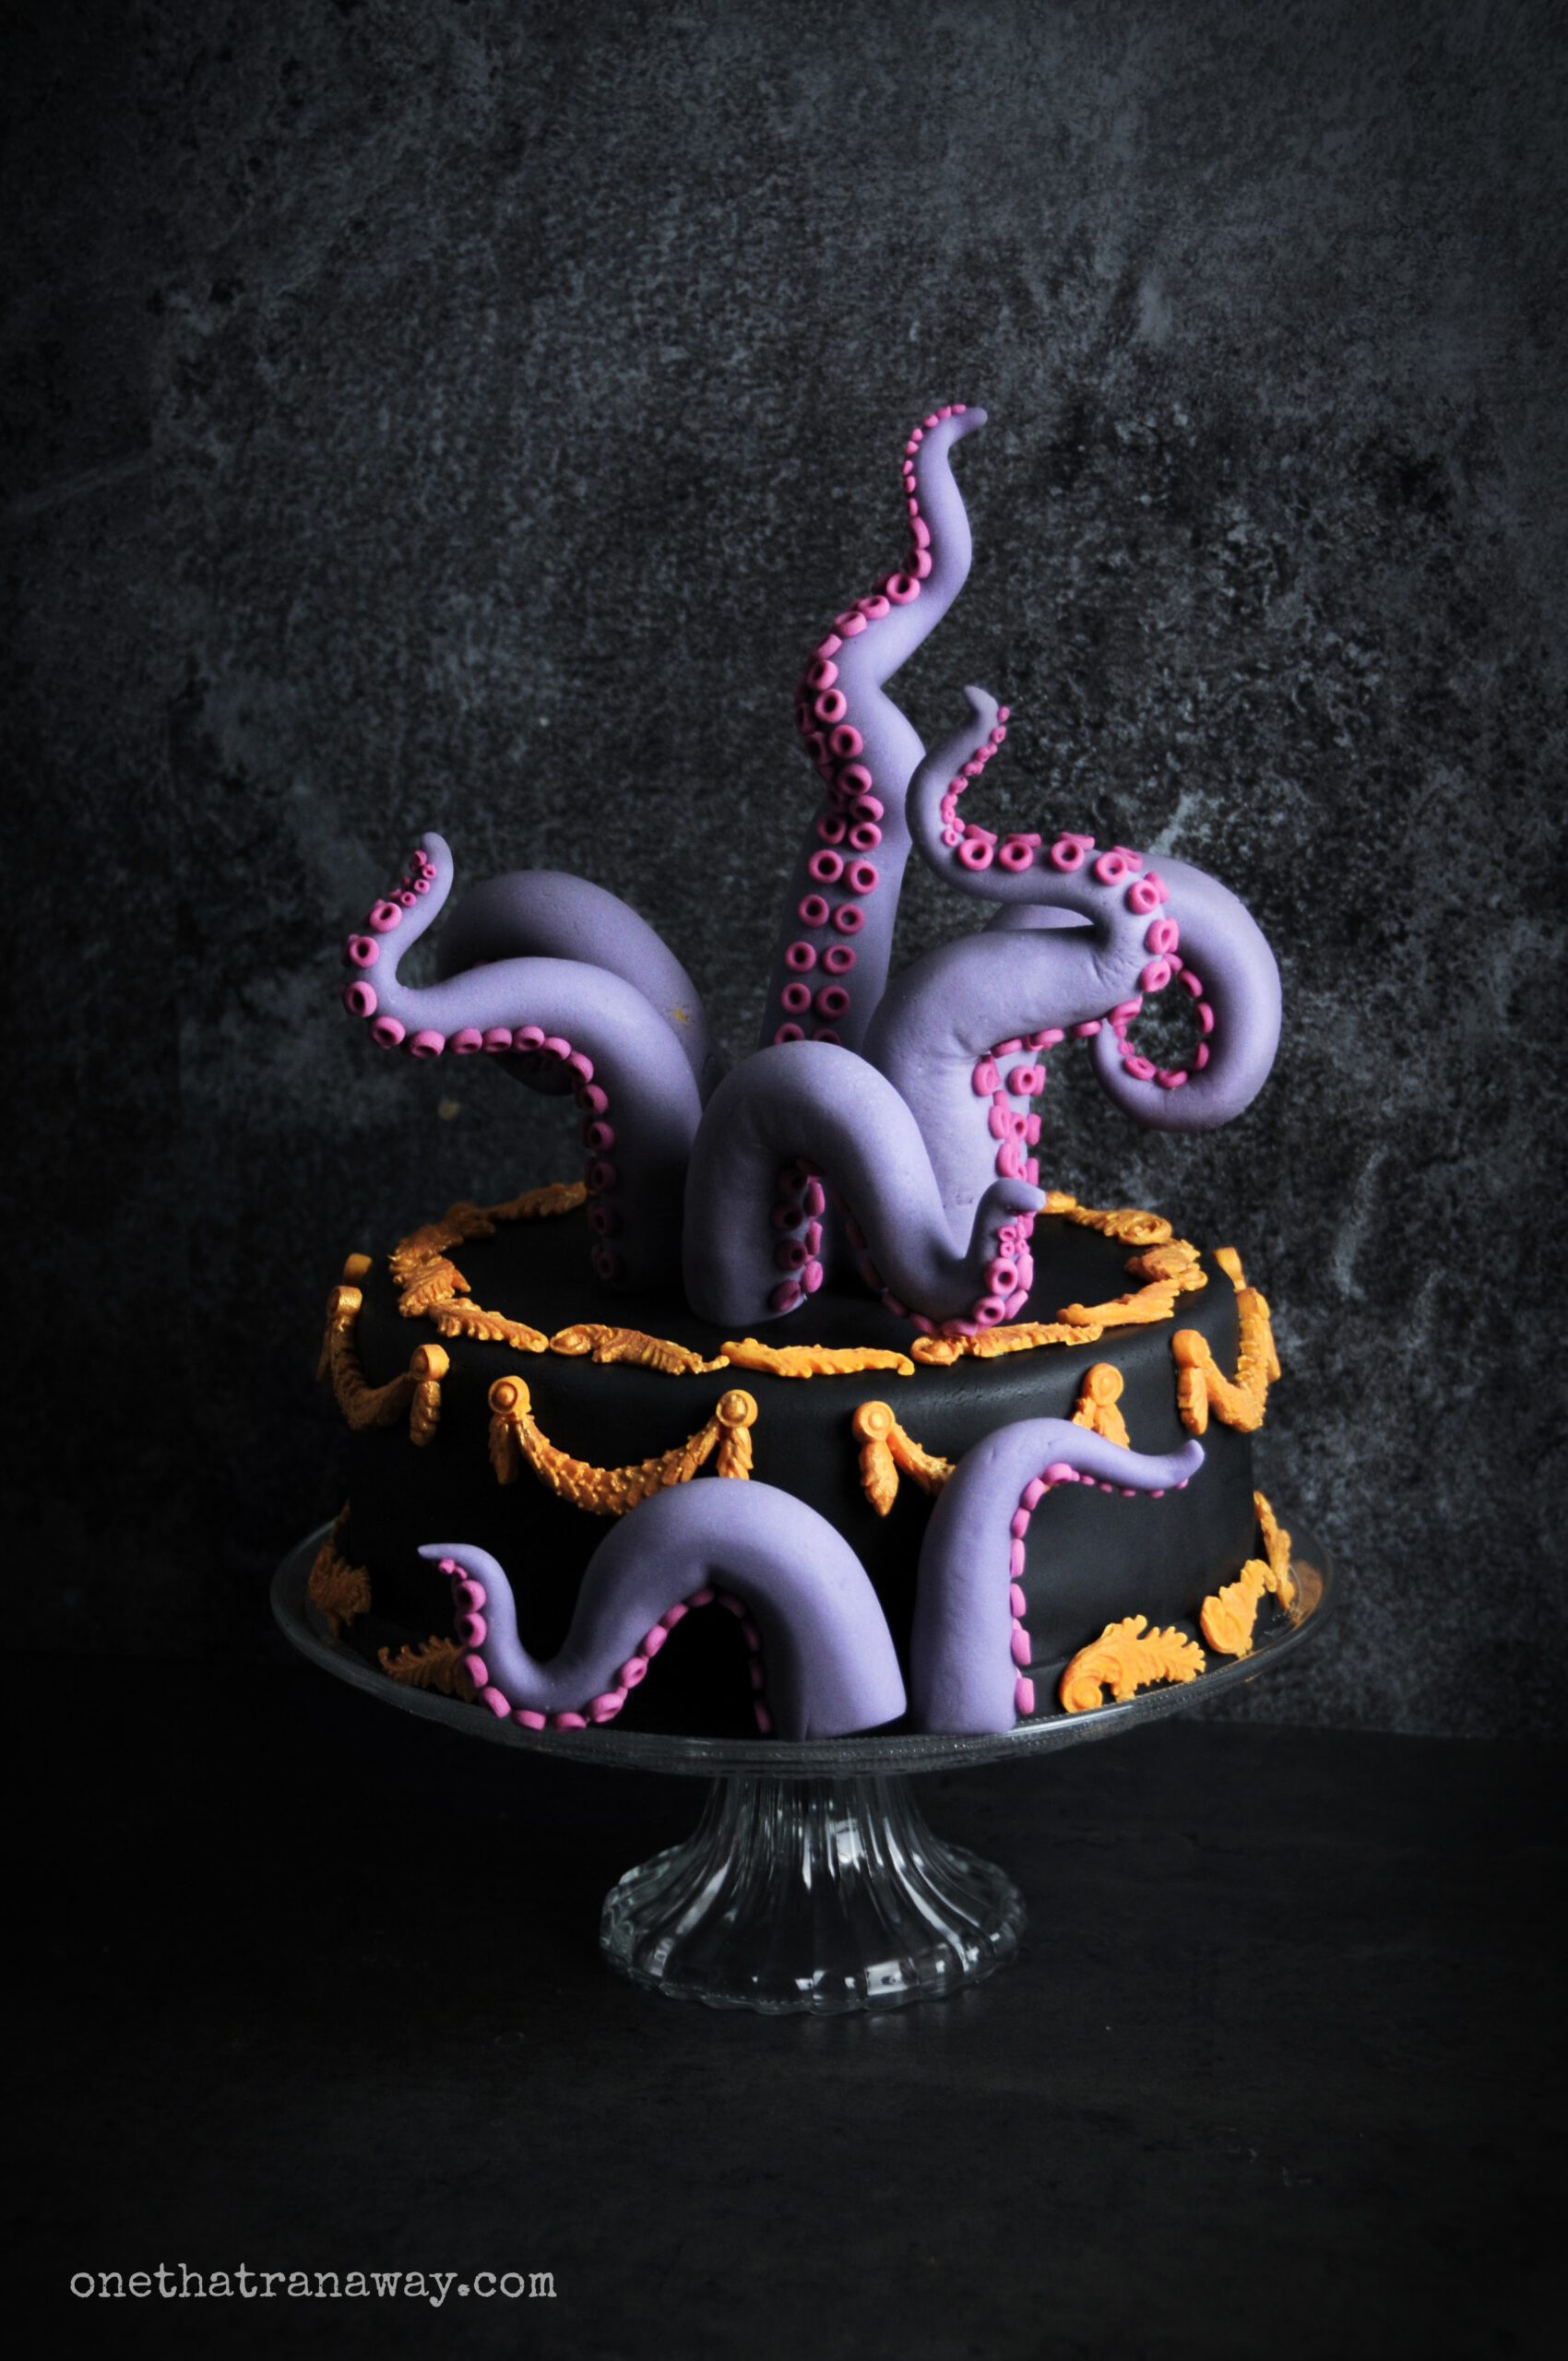
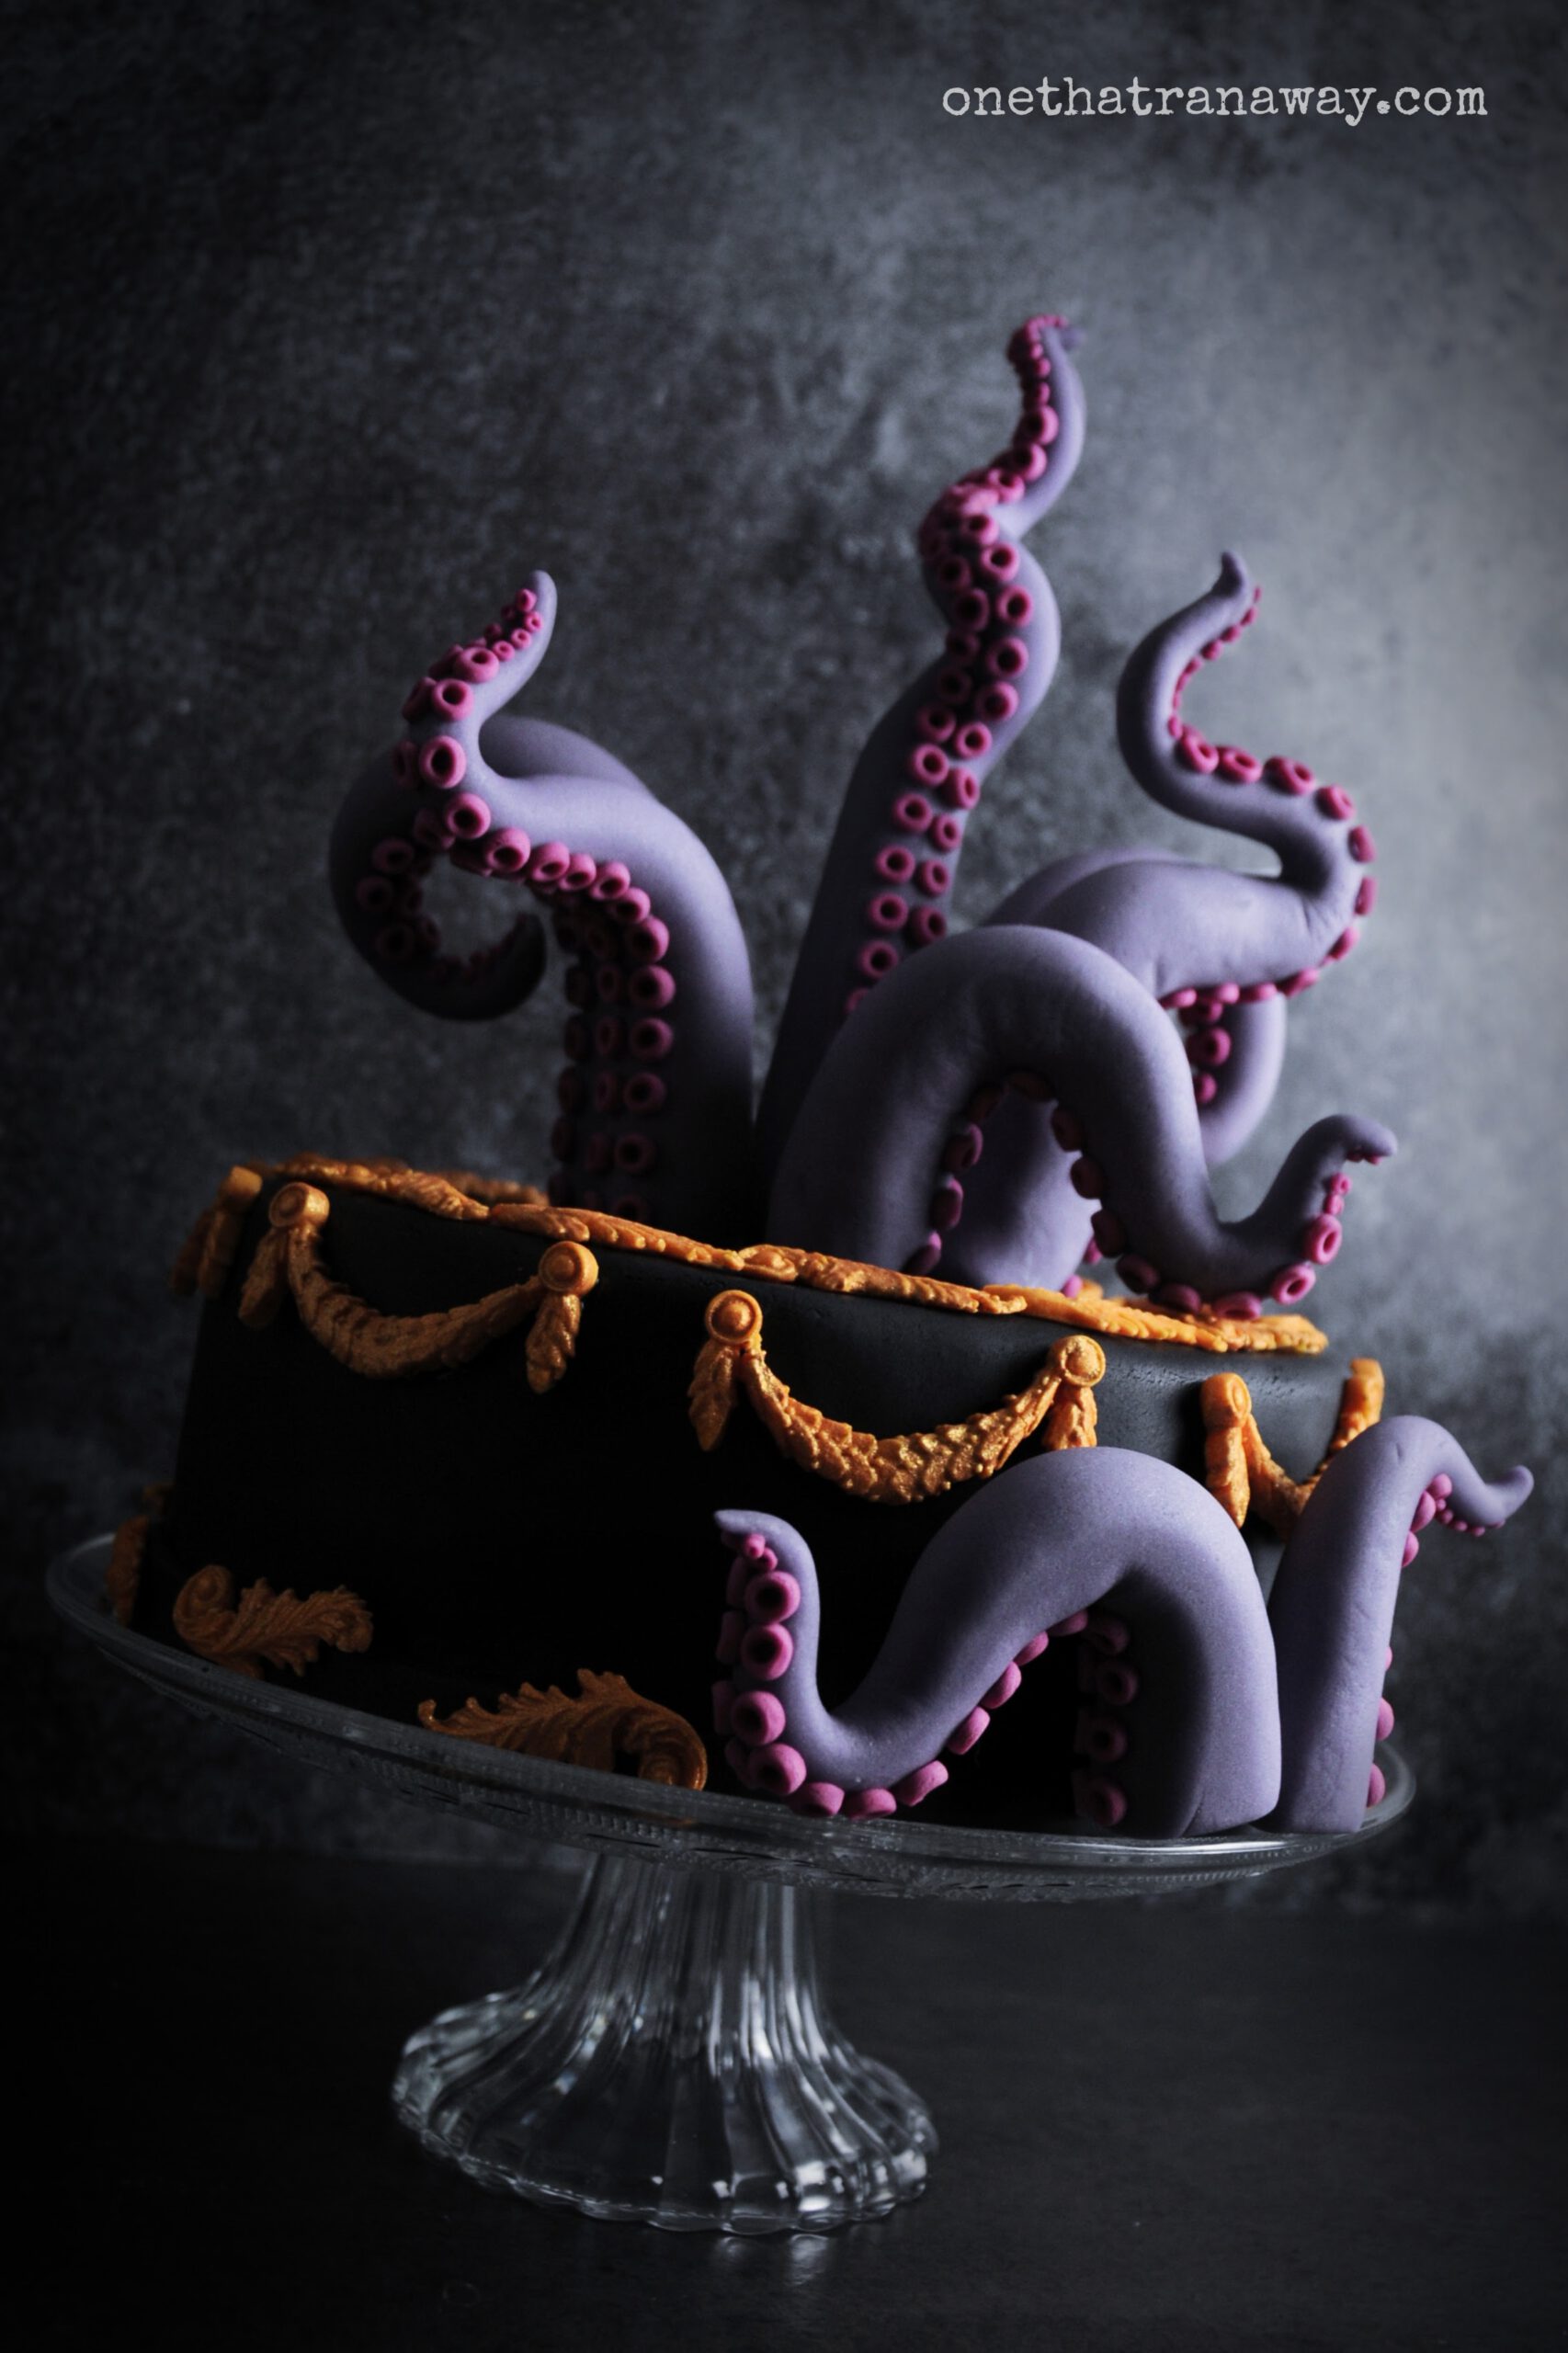
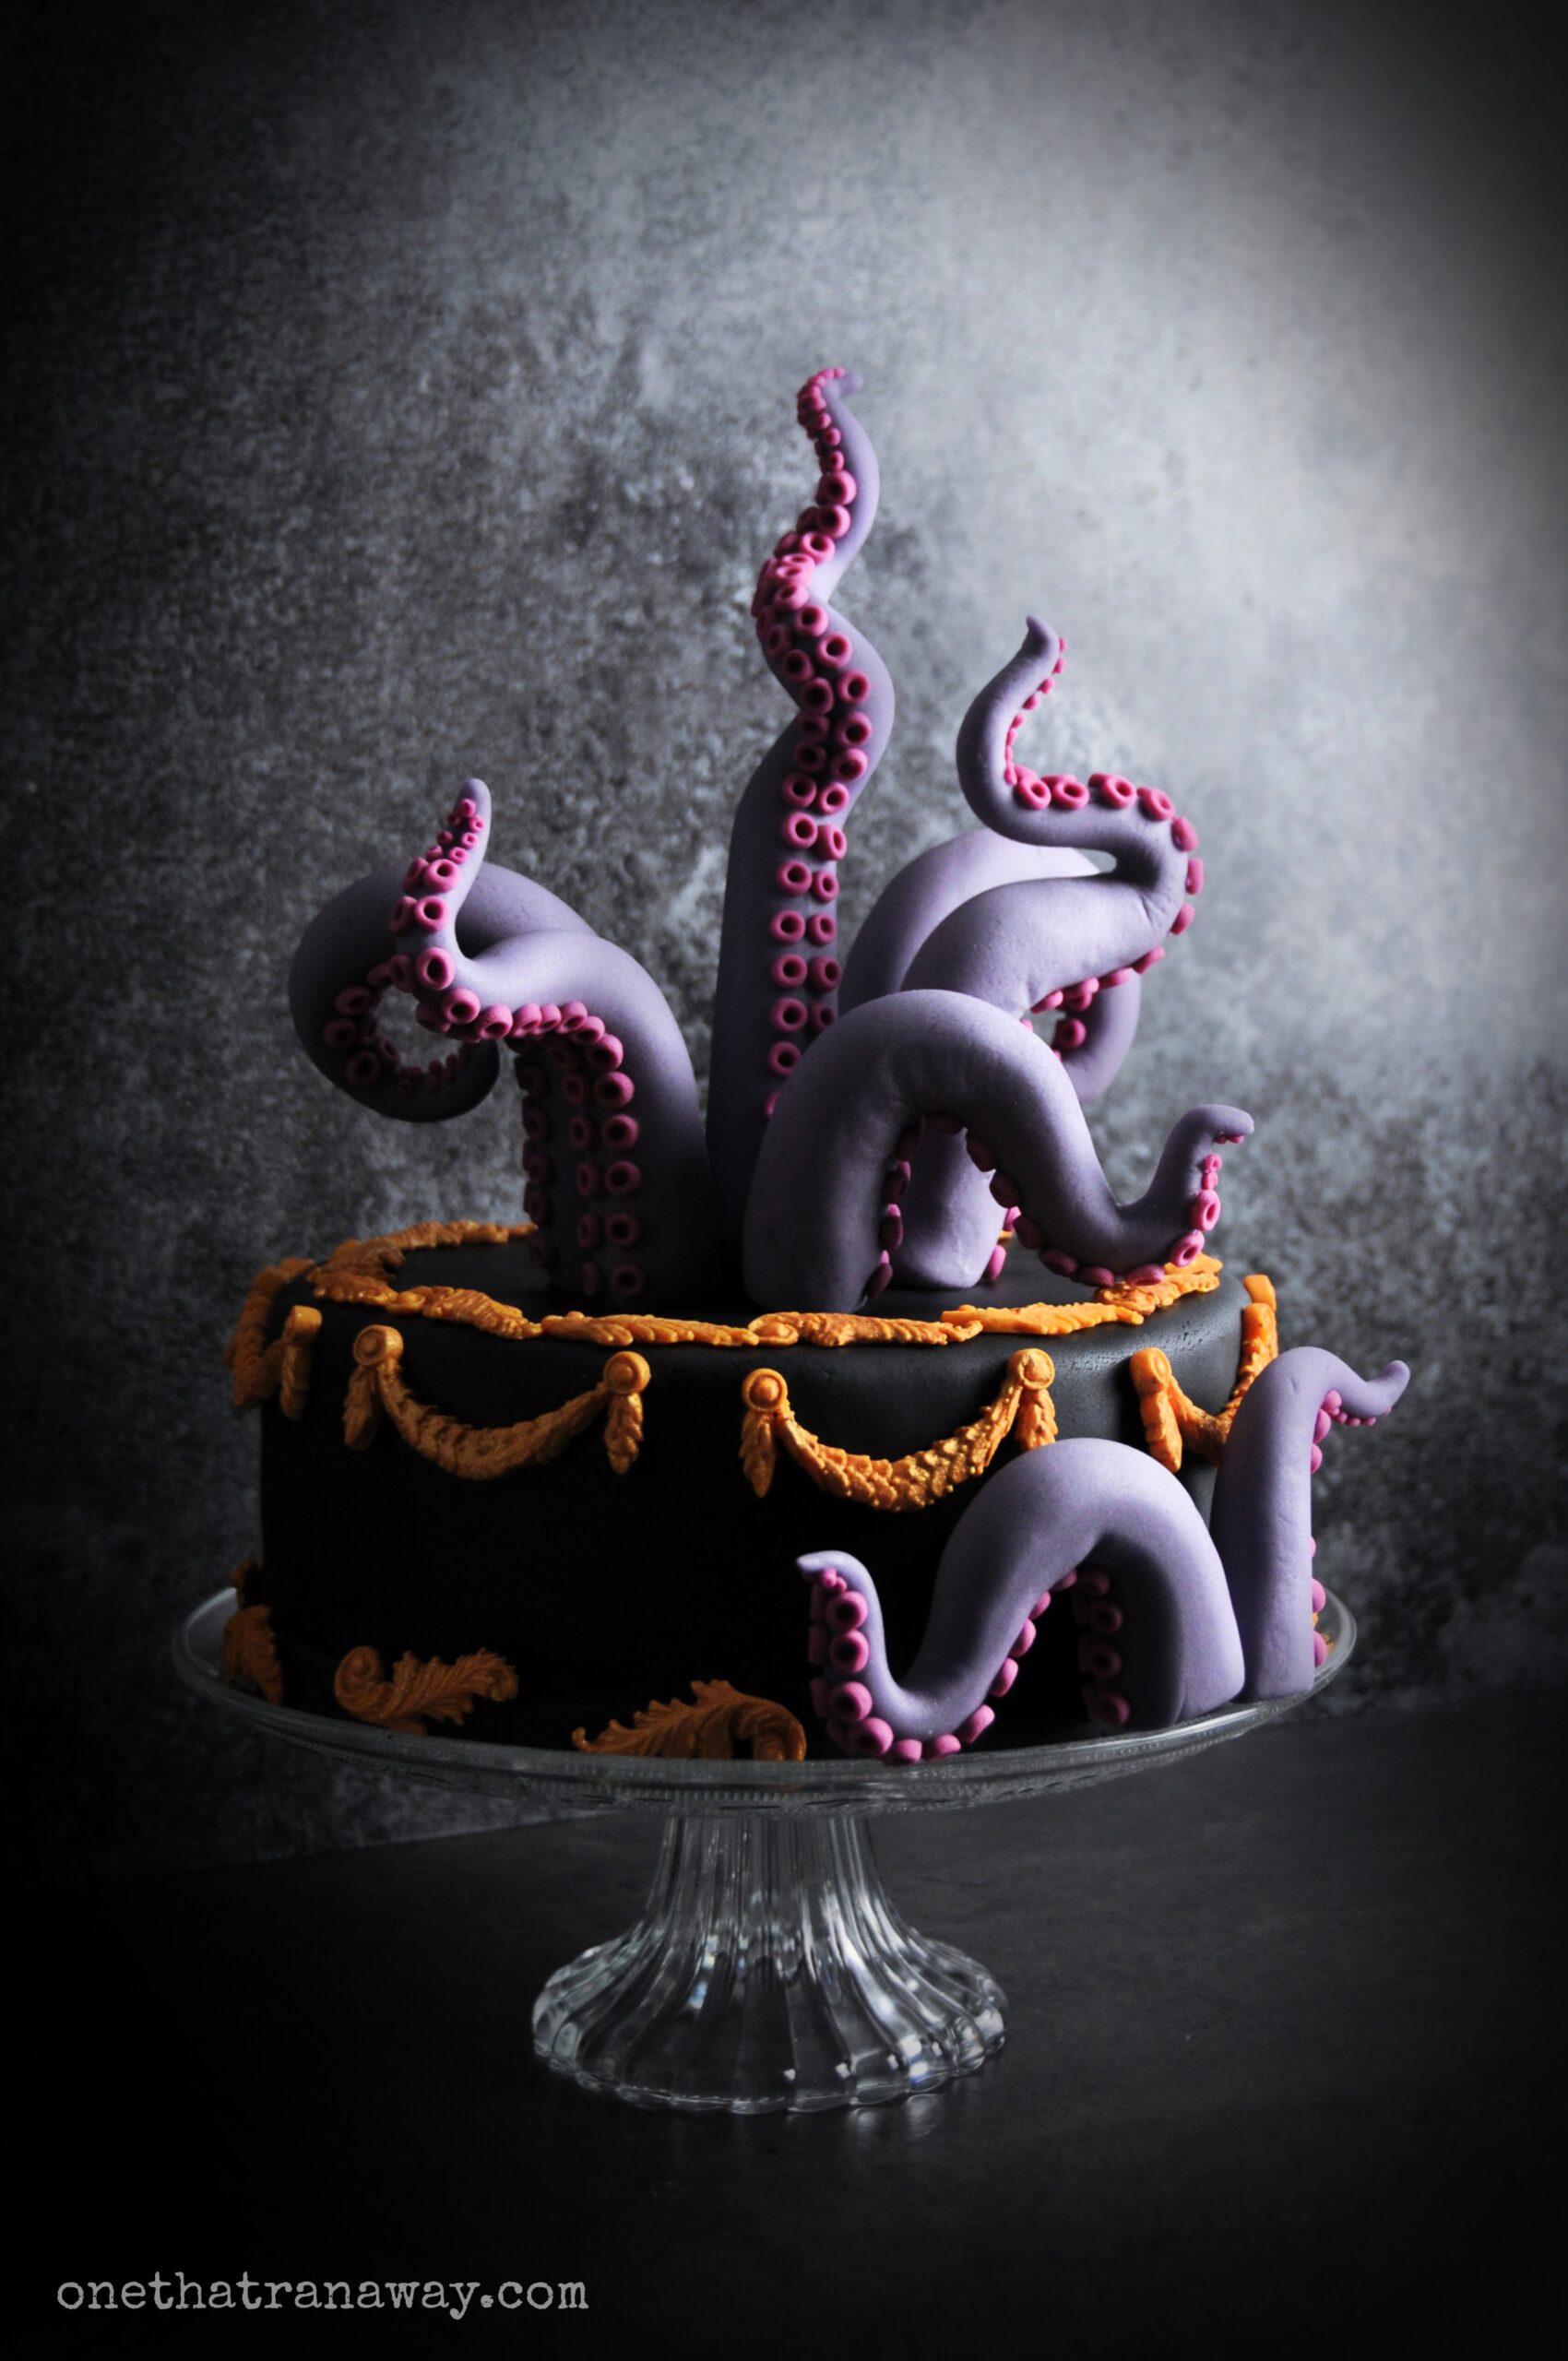
For this cake, you’ll need plenty of fondant or modelling chocolate, round piping tips, toothpicks, golden food colouring and a cake of your choice. Make sure to use a heavy, dense cake that provides enough structural integrity for the fondant decorations on top. Otherwise, those decorations will either sink in or not hold, at all. I used my authentic German Baumkuchen for this one, because the dense Baumkuchen cake provides a perfect base for the relatively heavy tentacles, so they will stand upright and hold their position.
My cake was a 22 cm (ca. 8.7 inch) diameter cake, frosted with a thick and sturdy chocolate ganache.
You can use any shape or size of cake to make a tentacle cake. However, if you need larger tentacles because you have a bigger cake, those tentacles will be heavy and harder to handle. In this case, it might be useful to skip the solid fondant tentacles and wrap the fondant around a lighter filling such as homemade and shaped rice krispies treats or even tin foil. Needless to say: tentacles with tin foil-filling will not be entirely edible. If your tentacles are smaller, like mine, you can form them from solid fondant.
You can change the colours of your tentacles and cake as needed. Green, black, blue, purple – choose whatever you like best. Here, I used black fondant to cover the cake. If you only want a frosted cake, you can easily omit this step. I used purple and dark pink fondant for the tentacles, and for the gold ornaments orange fondant.
As always: I know there are people who do not like fondant. That’s fine. I don’t like the taste, either. In this case, just don’t eat the fondant and focus on the cake underneath.
You will have to start a few days ahead of serving the tentacle cake with the fondant decorations, as they need some time to dry.
recipe
ingredients / supplies:
for the tentacles:
- 250 – 300 g (around 8.8 – 10.5 oz) purple fondant for the tentacles
- 100 g (around 3.5 oz) dark pink fondant for the suckers
- edible glue
- two round piping tips for the suckers (I used piping tips with 2 mm and 6 mm diameter)
- toothpicks
- a rolling pin
- cornstarch to dust the surface and fondant
for covering the tentacle cake & ornaments (optional):
- 150 g (around 5.3 oz) orange fondant for the ornaments
- 450 g (around 14.9 oz) black fondant to cover the cake
- gold food colouring
- edible glue
- ornament silicone moulds (unpaid advertising)
- a cake of your choice (it’s best to use a round, dense cake for better support of the tentacles), frosted with ganache or buttercream (whipped cream will not work with fondant!) – I used a round 22 cm (ca. 8.7 inch) diameter Baumkuchen cake with chocolate ganache
instructions:
the tentacles:
Divide the purple fondant (or base colour, if you wish to use other colours) into 6 to 9 portions. They don’t need to be equal in weight and size. Different sizes will give you more realistic tentacles, because not every tentacle will look the same. For my tentacle cake, I used eight tentacles: six on top of the cake and two on the side.
Knead each portion of fondant thoroughly.
When you are done, roll your fondant portions into a rough and stretched out cone form under your hands. It might help to dust the surface with cornstarch, so the fondant won’t stick. Those long, stretched out cones will be your tentacles.
Cut off the bottom of each cone/ tentacle, so they will lay flat on the cake when you apply them.
Shape each tentacle into curls and twists. Have a look at pictures of tentacles or use the photos here as a reference. Make sure that each tentacle will have a different form to make your cake extra realistic and creepy. Because nature doesn’t normally produce identical things. It loves variation.
Once you are satisfied with the shaped tentacles, put them aside.
Next, knead and roll out your dark pink fondant (or a contrasting colour to your base colour) with your rolling pin. Use a dusting of cornstarch, if needed. Don’t roll it out too thinly, because we want beautiful, thick suckers on top of our tentacles. It should be around 3mm or 0.1 inches thick. I like to use skewers to guide the rolling pin.
Now use the piping tip with 6 mm opening (or larger, if you want bigger suckers) to cut out thick circles from the fondant. You will need A LOT of them. I needed around 60 to 100 suckers per tentacle, but it depends on the size of your tentacles and suckers. So have patience with this step. You might need to knead and roll out the leftover fondant several times. Take your time.
To punch a hole into your circles, use the smaller, 2 mm piping tip. Note that the hole will be bigger than the opening, because your piping tip is a cone and as it pushes through the fondant, it will widen it. Repeat this step with all of your fondant circles to make your suckers.
While doing so, you will find that the tiniest cut outs will gather inside your small piping tip. You will need them for the smaller suckers. Collect them as you go.
Once you are done with the larger suckers, take the punched out leftovers and a tooth pick. Push through the dots with the tooth pick and widen the hole carefully, so you get the tiniest donut-shape for your small suckers.
Leave everything to dry for a while (a few hours to a few days), if you have the time. If you don’t have time, you can proceed immediately, but the fondant will be a little harder to handle. Both works.
Use the edible glue and spread it along your tentacle in a line where the bottom of the tentacle would be. Now glue pairs of your larger suckers onto the tentacle. I like to start at the base of the tentacle. Once it gets too thin to hold two of the larger suckers next to each other, move on with two small suckers.
Once you are satisfied with your tentacle, push a tooth pick or skewer through the base, so it will later hold on your cake. For the two tentacles at the side of the cake, I pushed the tooth picks through the back of the tentacle, so I could attach it sideways.
Repeat with the rest of your tentacles and suckers.
Leave to dry for a few days.
ornaments:
If you wish to proceed with the ornaments, knead your orange fondant and break it into smaller pieces the size of your mould. Dust your silicone moulds with cornstarch. Press the orange fondant into the silicone mould, cut off excess fondant and release the ornament from the mould.
Leave to dry.
After the ornaments have dried completely, paint them with your golden food colouring and leave to dry once more.
assembly:
The day of the serving your tentacle cake, roll out your black fondant (or the colour of your fondant cover) into a large circle and cover your cake with it. Smooth out if needed. If you only want a frosted cake without fondant cover, omit this step.
Now place your gold ornaments on top of the cake in a circle, and along the base as a ring around the cake. Use edible glue if using a fondant cover.
Afterwards, position your fondant tentacles in the middle and at the side of your cake as if they are coming from inside. Make use to position the larger ones in the middle and the smaller ones around them for a pleasing, proportional look.
Now scare your guests and enjoy!
And as always: share and like and subsribe, if you liked this post.
Auf Deutsch, bitte:
Tentakel Torte
Zutaten / Zubehör
für die Tentakeln:
- 250 – 300 g violetter Fondant für die Tentakeln
- 100 g Fondant in dunklem Pink für die Saugnäpfe
- essbarer Kleber
- zwei runde Spritztüllen für die Saugnäpfe (ich benutze Spritztüllen mit 2 mm und 6 mm Durchmesser)
- Zahnstocher oder Holzspieße
- Teigrolle
- Speisestärke zum Bestäuben der Arbeitsoberfläche und des Fondants
für das Eindecken des Kuchens und die Ornamente (optional):
- 150 g orangener Fondant für die Ornamente
- 450 g schwarzer Fondant zum Eindecken der Torte
- goldene Lebensmittelfarbe
- essbarer Kleber
- Ornament-Silikonformen (unbezahlt)
- Kuchen oder Torte nach Wahl (am Besten einen runden, festen Kuchen für guten Halt der Tentakeln), umhüllt mit Ganache oder Buttercreme (Schlagsahne funktioniert bei Fondant nicht) – ich habe einen runden 22 cm Durchmesser Baumkuchen mit Schokoladen-Ganache verwendet
Anleitung:
Als Erstes den lila Fondant (oder die gewünschte Basis-Farbe) in sechs bis neun Portionen teilen. Die Portionen müssen nicht gleich schwer bzw. groß sein. Unterschiedliche Größen werden die Tentakeln realistischer erscheinen lassen, denn nicht jede Tentakel wird gleich aussehen. Für meinen Kuchen habe ich acht Tentakel verwendet: sechs auf dem Kuchen und zwei an der Seite.
Jede Fondant-Portion gründlich durchkneten.
Nun die Fondant-Portionen unter der Handfläche grob zu lang gezogenen Kegeln formen. Hier hilft es, die Arbeitsfläche mit Speisestärke zu bestäuben, damit der Fondant nicht kleben bleibt. Diese lang gezogenen Kegel bilden die Tentakel.
Nun den Boden jedes Tentakels glatt abschneiden, so dass sie flach auf der Torte aufliegen können, wenn sie befestigt werden.
Jeder Tentakel wird nun in Form von Kurven, Korkenziehern und Drehungen geformt. Hier hilft ein Blick auf Bilder von echten Tentakeln oder die Fotos hier als Referenz. Jeder Tentakel sollte eine individuelle, unterschiedliche Form haben, um die Torte extra realistisch und gruselig zu machen. Die Natur produziert nur selten identische Dinge. Sie liebt Variation.
Sobald die Form der Tentakel zufrieden stellend ist, werden diese zur Seite gestellt.
Als nächstes den pinken Fondant kneten und mit der Teigrolle ausrollen (oder die kontrastierende Farbe zur Basis-Farbe). Auch hier bei Bedarf Speisestärke zum Bestäuben verwenden. Den Fondant nicht zu dünn ausrollen, denn hier sind schön dicke, pralle Saugnäpfe für unsere Tentakel gewünscht. Sie sollten etwa 3 mm dick sein. Ich benutze gerne Holzspieße, um die Teigrolle zu führen.
Nun mit den 6 mm Durchmesser Spritztüllen (oder größer, wenn es größere Saugnäpfe sein sollen) kleine Kreise aus dem ausgerollten Fondant ausstechen. Wir benötigen hier EINE MENGE davon. Ich habe etwa 60 bis 100 Saugnäpfe pro Tentakel benötigt, aber es hängt von der Größe der Tentakel und Saugnäpfe ab. Hier ist also Geduld gefragt. Bei Bedarf den übrig gebliebenen Fondant wieder kneten und immer wieder neu ausrollen.
Um die Löcher in die kleinen Fondant-Kreise zu stechen, wird hier die kleinere 2 mm Öffnung der zweiten Spritztülle verwendet. Das entstehende Loch wird größer als die Öffnung sein, da die Tülle ebenfalls ein Kegel ist und beim Durchstechen den Fondant weitet. Diesen Schritt wiederholen, bis alle kleinen Fondant-Kreise ein Loch haben und wie Saugnäpfe aussehen.
Während dieses Prozesses werden sich kleine ausgestochene Reste in der kleinen Spritztülle sammeln. Diese benötigen wir, um die kleineren Saugnäpfe zu formen. Die kleinen Reste also nicht wegwerfen, sondern während des Ausstechens sammeln.
Sobald alle größeren Saugnäpfe fertig sind, wird nun sehr vorsichtig mit einem Zahnstocher durch jeden der kleinen ausgestochenen Rest-Punkte mittig ein Loch gestochen und langsam geweitet. So entstehen winzige donut-förmige Saugnäpfe.
Nun alles für eine Weile trocknen lassen (ein paar Stunden bis ein paar Tage), wenn die Zeit dafür vorhanden ist. Ist die Zeit nicht vorhanden, kann sofort weiter gemacht werden, aber der Fondant ist so etwas schwieriger zu bearbeiten. Beides funktioniert.
Mit dem essbaren Kleber nun entlang jedes Tentakels auf der Tentakel-Unterseite eine breite Linie aufgragen. Als nächstes Paare der größeren Saugnäpfe nebeneinander auf den Tentakel kleben. Ich beginne gerne unten an der Basis der Tentakel und arbeite mich nach oben. Sobald der Tentakel zu dünn für die größeren Saugnäpfe wird, zu den kleineren Saugnäpfen wechseln.
Sobald alle Tentakel mit einer Reihe an Saugnäpfen versehen sind, einen Zahnstocher in den Boden der Tentakel einstecken, so dass sie später besser auf der Torte halten. Für die Tentakel an der Seite der Torte habe ich die Zahnstocher hinten angebracht, so dass sie seitlich eingesteckt werden können.
Nun diese Schritte mit allen Tentakeln wiederholen und für ein paar Tage trocknen lassen.
Soll es nun mit den Ornamenten weitergehen, wird der orangene Fondant gut durch geknetet und in kleinere Portionen zerteilt, die in die Silikonformen passen. Die Silikonformen mit Speisestärke bestäuben. Den orangenen Fondant nun in die Silikonform pressen, den überschüssigen Fondant abschneiden und das so entstandene Ornament vorsichtig aus der Form lösen. Wiederholen, bis genügend Ornamente entstanden sind.
Trocknen lassen.
Sobald alle Ornamente getrocknet sind, werden sie mit der goldenen Lebensmittelfarbe bemalt und sollten noch einmal trocknen.
Am Tag des Servierens den schwarzen Fondant (oder die Farbe der Fondantdecke) in einem großen Kreis ausrollen und die Torte damit eindecken. Bei Bedarf glätten. Sollte nur ein gefrosteter Kuchen gewünscht sein, kann die Fondantdecke auch weggelassen werden.
Nun die goldenen Ornamente auf der Torte in einem Kreis um den Rand herum und als Ring um den Boden der Torte platzieren. Sollte eine Fondantdecke verwendet werden, ist hier essbarer Kleber nötig.
Als letztes die Fondant-Tentakeln mittig in die Torte sowie seitlich am Rand einstecken. Es sollte so aussehen, als kämen die Tentakel aus der Torte heraus. Indem man die größeren Tentakel eher mittig und die kleineren nach außen platziert, erhält man ein natürliches, proportionales Aussehen.
Nun können die Gäste erschreckt werden!
Anmerkungen:
Diese Torte benötigt viel Vorbereitungszeit. Es ist notwendig, mehrere Tage vor dem Servieren mit dem Formen des Fondants zu beginnen, da die Teile immer wieder trocknen sollten.
Den essbaren Kleber und die goldene Lebensmittelfarbe gibt es im gut sortierten Fachhandel oder in Online-Shops.
Ein fester, schwerer, nicht zu luftiger Kuchen bietet hier die Festigkeit und Basis für die Fondant-Dekorationen. Ist der Kuchen zu leicht, werden die Dekorationen nicht halten und umkippen. Ich habe hier mein bewährtes Baumkuchen-Rezept verwendet, da der Kuchen fest und stabil genug ist, um die Tentakel zu tragen.
Meine Torte war 22 cm im Durchmesser und mit dicker Schokoladen-Ganache umhüllt.
Bei größeren Torten und damit größeren Tentakeln ist es ratsam, diese nicht voll aus Fondant zu formen, sondern selbst gemachte Rice-Krispies-Treats oder eine Basis aus Alufolie mit Fondant zu umwickeln, damit die einzelnen Tentakel leichter werden.
Die Farben der Tentakel können beliebig angepasst werden.